September 28, 2024

Week 6 and 7 - Selections/decisions in Raptor programming

CLASS OBJECTIVE

Create an algorithm to decide between three different formulas, by using the decision symbol in Raptor, to calculate areas from a rectangle, circle or triangle.


INTRODUCTION

In the last course you learned to use the IF() function in a spreadsheet. It helped you to create programs in which users could make decisions, for example, between answers or products, etc. Now you'll program Raptor algorithms to make decisions, to select between different options.


DECISIONS

Just like in the last class, you just have to drag the decision (selection) symbol from the left panel to the flowchart. It is very important to place it where a decision has to be made, after you have saved information in a variable.

Once you've inserted the symbol you can double click on it to configure the decision. A decision is a compairson operation like in spreadsheets. For example, N1=10, lastname="González", etc.

In the examples, N1 or lastname are declared variables, this means that you used them and saved information in it before you make the decision.

Here's another example.


As always, it'll be easier to understand by developing a couple of programs.


ACTIVITY

Today's program will calculate areas of common shapes: rectangle, circle or triangle. Open Raptor and start saving the file. Name it Areas of common shapes. 

Obviously, you'll have to use decisions, Selections symbols, to create different paths in the code.

From this point on it's important that you receive less instructions, so look at the flowchart and try to solve the problem.

  • Use an input to ask for the shape: (1) for triangle, (2) for rectangle, (3) for circle. The variable will be named Shape.
    • Remember to double click on every symbol to set the configurations. For example, to get the decision about the shape or to get the shapes dimensions ,you need inputs, and every input need a variable to save the data.
  • Use the selection symbol, as shown, to create the four paths. Ask for the variable Shape to decide the path.
  • Each path should ask for the data of the selected shape, for example: triangle need the base and the height to calculate the area.
  • If the user don't select a correct option, then a message should be shown.


Test the program and if it works send it to your teacher through Classroom.


CLASS NOTES

As always, write down in your notebook the title of the class, the objective and follow the instructions.

  • In your own words, What is the difference between sequential programming (last class) and decisions/selections programming?  (Use at least 60 words)
  • Now explain the Rhombus symbol (Diamond): What does it do? What does it need to work properly?


September 21, 2024

Week 5 - Sequential coding in Raptor

CLASS OBJECTIVE

Recognize that when programming there are different techniques to write code, and the first is the sequential coding, which means that the code executes step by step from the start to the end, without alternate paths.


INTRODUCTION

Now you know how Raptor works: through the creation of flowcharts. Last class, Two new symbols were introduced to you, the input to collect information and the output to show the results.

Besides, there was another important concept that we have to reinforce: variables.


VARIABLE is a memory space reserved to save information. Before you start any process you have to declare variables, which means give them name and type. In the Raptor case you just have to name the memory space in an input or assignment.

perimeter ── 3.1416*radius

In the example, there are two variables, radius that already has information saved in it, and perimeter which is a new space of memory that will receive the result of the multiplication.


Variable names can't have special characters, such as @ *  #. The suggestion is to use lowercase letters and/or numbers, in this order, without spaces.

Tip: you can compare variables with cells in a spreadsheet. You can type information in them to save it, and any cell has its own name.


ACTIVITY

You'll create a program to calculate your first period average. Open raptor and start saving the file. Name it Average Calculator and your student number, example: Average Calculator 12345

  • Insert 12 Input symbols, one for each subject.
  • Configure each one of them to ask for the final subject score, and name the variable as the subject. Example, ask for "Español" final grading and save it in a variable named español.


  • Now, insert an assignment symbol after the input boxes. 
  • Configure it to add the 12 gradings and divide the result into 12. Assign the final average to a variable named periodaverage. As you can see, there is no space between the words.


  • For the last, insert an output symbol. Configure it to show the periodaverage variable.
  • Test the program and if it works send it to your teacher through Classroom.

 As you can see, this program executes every step, one by one, until the end. This is called sequential coding.

Next class we'll use the rhombus symbol once again to decide between different paths, by making decisions.


CLASS NOTES

As always, write down in your notebook the title of the class, the objective and follow the instructions.

  • What does "sequential coding" mean?
  • What is a variable?
  • Variable names must avoid special characters, Name at least 5 of these special characters.
  • Draw a flowchart, such as in the activity, to calculate the course average, asking for the three period averages.


HOMEWORK
You will do an investigation about Algorithms and Programs. Write down the next questions and anwer them in your notebook, using your own words.
  • What is the meanning of Algorithm?
  • What is the difference between Algorithm and Program?
  • Describe in your own words an algorithm to solve a home problem.

September 17, 2024

Week 4 - Raptor programming environment

CLASS OBJECTIVE

Know the Raptor programming environment for the first time, by creating a program that performs a basic process to request information, do a process and displays a result.


FLOWCHARTS

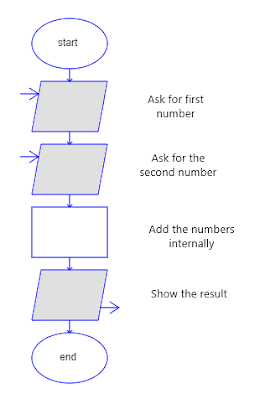
Last class you learned to use 3 flowchart symbols: the elipse (oval), the arrow and the rectangle. Now you'll learn to represent interaction with users though the paralelogram that may represent input and output.
Before start programming 


  • Process or assignment, which represent the internal processes like calculations or the manipulation of the information.
  • Input ask a person to introduce information, for example, words or numbers.
  • Output does exactly the opposite, it shows information to the user, mostly the results of the processes. 

Let's try one last paper flowchart using the Input and Output symbols.


RAPTOR

Before we start with Raptor you have to install the Direct access icon. Follow the next directions:

  1. Open the Window´s File Explorer and the "Este equipo" option on the left panel.
  2. Double click on the Hard Disk Drive (Usually C:)
  3. Now look for the "Archivos de programa (x86)" folder and get into it.
  4. Look for the "Raptor_avalonia" folder and get into it.
  5. Locate 


INTRODUCTION

You've been learning to create problem solutions using technology tools. Now you'll be introduce to programming languages with Raptor programming environment.

With Raptor you´ll create programs (algorithms) and when you execute them you'll see the process step by step.

The Raptor main feature is that the programs will be created using flowcharts. 


When you open Raptor you'll alway see the ellipse figures that start and end the program. Between them you'll have to place the flowchart elements that will be executed. 


FIRST PROGRAM
Obviously  you'll have to open Raptor. It should be installed in your Windows desktop. Its icon shows a dinosaur.
Once opened, Raptor will show you 2 windows, the main programming window and the master console. You'll design in the main window but you'll see the results of your algorithm in the master console. (You can look at the image up above)

To start you just have to drag the symbols (input, output and assignment) to the space between the start and end ellipse.
  • Drag the Input symbol to the main structure 
    • Double clic on the input symbol. 
    • "Prompt" is the text that will be shown to the user. Type "What is your name?"
    • "Variable" is the name that will be assign to information collected. Type NAME
  • Drag the Assignment symbol to the structure
    • This is the process that will be executed. Double clic on it.
    • Type SALUTE in the SET text box. 
    • Then type "WELCOME "+NAME+" TO RAPTOR"
  • Drag the Output symbol to the structure
    • Double clic on it.
    • Type "SALUTE"
    • This will be the answer that will be shown in the console window.
To execute the algorithm press the play button. Before, I suggest to slow the execution so you can see it step by step.

To save the algorithm click on the FILE menu, select SAVE and type a name for the file.


ACTIVITY

Instead of typing messages, you´ll create a small calculator. Clic on FILE menu and NEW to create a new algorithm.

  • Use 2 input symbols to ask for two numbers. 
    • Name them N1 and N2
  • Use 4 assignment symbols to Add, Subtract, Multiply and Divide. 
    • Name them ADDITION, SUBTRACTION, MULTIPLICATION and DIVISION
  • Use 4 output symbols to show the results. 
Name the file as CALCULATOR.rap
You'll deliver this file through a Classroom post.


CLASS NOTES

As always, write down in your notebook the title of the class, the objective and follow the instructions.

  • Explain in your own words, What is Raptor?
  • What does "programming environment" means? You can use Google.
  • Draw the Raptor symbols that we used in today activities.


September 07, 2024

Week 3 - Introduction to Flowcharts

 CLASS OBJECTIVE

Recognize the use of symbols to represent a process when working with flowcharts, and identify the first three basic symbols: start/end, arrow, and process.


Common Symbols

A symbol is usually a drawing with a meaning that many can easily understand. For example, can you tell the meaning of every symbol on the next image?


Probably most of you were able to identify the meaning of all the symbols above since they each have one meaning or represent a single action or tool. But what happens when you want to represent a set of steps or a process? Well, there is a graphic resource that allows us to represent a process using mainly symbols, and it is called a flowchart.


HOMEWORK INFORMATION RECOVERY

Let's all discuss about your homework results, in plenary:

  • What is a flowchart?
  • What are the different symbols in a flowchart and their meaning?
  • What are flowcharts commonly used for?
  • Draw an example of a flowchart and explain it.


Helpful references

What is a programming flowchart?

A programming flowchart is a visualization tool programmers use when creating new applications to understand a process, workflow or algorithm. It typically uses geometric shapes to represent steps and arrows to communicate the flow of data.

Indeed Editorial Team(September 28, 2023),What Is a Programming Flowchart?,https://www.indeed.com/career-advice/career-development


Flowcharts

A flowchart is a diagram that represents an algorithm. It is read from top to bottom and uses shapes and arrows to show what happens in a program. You and your team can use flowcharts to help plan out how to create your code and organize your code.

2024 Technovation, Flowcharts, https://technovationchallenge.org/


FIRST STEPS INTO FLOWCHARTS: ARROWSTART/END AND PROCESS SYMBOLS

Algorithm

Most of you may have found, while doing your homework, that a flowchart is defined as "a diagram that represents an algorithm" and that is certainly correct. But what exactly is an algorithm?

An algorithm is simply a set of step-by-step instructions to complete a process (solve a problem or perform a specific task). The most important rule when creating an algorithm is that it must have a beginning and an end—this is known as finiteness.

So, whether you're creating a guide to prepare coffee or describing the steps to calculate the speed a rocketship needs to escape Earth, the algorithm must always come to an end at some point.

Start/End symbol:

When working with flowcharts, we use a specific symbol to represent the start and end of the process. This symbol is called "Terminator" and it is represented by an oval

  • This oval is placed at the beginning (labeled "Start") and at the end (labeled "End") of the flowchart.
  • Between these two ovals, we will insert the other symbols that represent the steps of our process.


Arrow symbol:
The Arrow symbol is used to indicate the flow (direction) that the flowchart is following. Although flowcharts are typically read from top to bottom, there are times when different paths are created, so it is important to use arrows from the beginning.


Process symbol:
The Process symbol  represents a step in the process. It is shown as a rectangle, and inside it, we write the instruction to be performed. We must ensure that the instruction is clear and precise to avoid any confusion (ambiguity).

You can use as many process symbols as you need, and inside each process symbol, there should be only one instruction. 

*Remember all the symbols must be placed between the start and end ovals.

Let's take a look at the next example:

To see the image in full size right clic on it an then select the option "open image in a new tab".
There you can zoom in the image to read the text.


CLASS ACTIVITY

For today’s activity, you’re going to create two different flowcharts in your notebook to represent two things you do when taking the Technology III class.

First flowchart:

  • Create a flowchart using only the start/end and process symbols to represent the steps a student must follow to enter classroom ( the online educational platform) once the student is sitting at the workstation. Take into consideration that the computer is turned off when the student arrives at the workplace

Second flowchart:

  • Create a flowchart using only the start/end and process symbols to represent the steps a student must follow to go from your workplace to the nearest bathroom in the school. Consider that the classroom door is open and the student has the teacher's permission to go to the bathroom.


Once you finish the two flowcharts, give them to the teacher for review. If the flowcharts are complete, the teacher will sign your activity. If not, the teacher will ask you to complete or correct them.


CLASS NOTES

Write down in your notebook the title of the class, the objective and follow the instructions.

Include in your notes the next questions and answer:

  • What is this flowhcart describing?
  • Do you think the flowchart is missing any steps? If so, write the step or steps that the flowchart is missing.