May 20, 2025

Week 31.b - Inputs and outputs, variables and assignments

CLASS OBJECTIVE

Interact with users by asking questions and reacting to their responses. 


QUESTIONS AND VARIABLES

You can ask users for information and either save it or not. Obviously you have to create variables before.

There is a difference between "saying" and "asking". When you use "Say" a message is shown. When you use "Ask" the algorithm waits for information.

Use "Set" to save the information into a variable.


ACTIVITY
Although you don't have to try the next Scratch program, analize it to make your own conclusions.


Link

May 19, 2025

Week 31.a - Objects and its algorithms

CLASS OBJECTIVE

Introduce the programming procedures for individual objects (sprite) and some of its main properties.


OBJECTS (sprites)

Using the lower-right panel you can add as many objects as you want, but each one of them have their indivudual properties, for example, position on the screen, size or orientation. Before you start creating algorithms you must be aware of these.


Some objects also have costumes, this is, a collection of alternate images to change the sprite appearance.


CODING EVENTS
Using events such as "click on sprite" or "press key", among others, you can change the appearance, position and size of any object. You can try with some of the next examples.


BROADCAST
By clicking an object you can send a message that can be received by others. This is used to activate more than one object algorithm at the same time.
In the next example, your can see 3 objects (and a different backdrop) programmed separately. When the buttons are clicked a message is sent and the boy object reacts when it recieves the message.


May 06, 2025

Week 32 - Project: Introduction and Planning

CLASS OBJECTIVE

Understand the final project we’ll be working on during this period. Analyze examples of interactive games created in Scratch that aim to solve real-life problems. Brainstorm and identify relevant challenges in our school environment to begin shaping your own game idea.

INTRODUCTION

This period, you'll be working on an exciting team project: creating a game in Scratch that helps solve a real problem from our school environment. The idea is to combine your creativity, programming skills, and teamwork to create something meaningful and useful.

Today’s session is all about exploring the project objectives, analyzing examples of games, and thinking about real problems we see at school.

ABOUT THE PROJECT

Objective:

The goal of this project is for you and your team to create a game or interactive story in Scratch that helps solve a real-life problem in your school environment. The problem can be anything that affects students or the school community—like learning math, using the keyboard properly, sorting trash correctly (plastic, organic, etc.), or any other issue you observe and think is important.

Stages:

The project will be developed over five weeks, each one focused on a different stage.
Today is Stage 1, where we will:

  • Learn about the project

  • Analyze examples

  • Choose the problem your team wants to solve

Deliverables:

Each session will have a specific task (or deliverable) that must be completed.
For today, your team will:

  1. Choose a problem that is present in your school environment.
  2. Write a hypothesis that describes the problem you chose
  3. Include a short justification explaining why the problem is important or relevant.
IMPORTANT: Most deliverables must be included in both:

  • Your team document (shared template provided by the teacher)

  • Each team member’s notebook

The teacher will let you know which deliverables are required in your notebook and which ones are not.

Team Document

Your teacher will provide a template that your team must use to collect and organize all the evidence and work from each stage of the project.


LETS SEE SOME EXAMPLES OF INTERACTIVE GAMES IN SCRATCH

Here are a few examples of Scratch games that aim to solve real-life problems:

You can explore these and other games on the Scratch website.
Remember: you can look at how these games are programmed, and if you find any game mechanics that could help in your own project, feel free to use or adapt them!

ACTIVITY

  1. Form your team based on the number of members your teacher assigns, and sit together.
  2. Discuss school problems you’ve noticed—things that make learning or daily life at school harder.

  3. Choose one problem your team wants to work on.

  4. Use the template provided by your teacher to write:

    • Problem to solve:
      • Write what issue or challenge you observed at school.
      • Example: First grade students don’t know how to do basic algebraic operations (addition, subtraction, multiplication, and division).
    • Hypothesis (What do you think causes the problem?):
      • We believe that… [who] + [what problem] + because… [possible cause]
      • Example: We believe that first grade students don’t know how to do basic algebraic operations because they don’t practice enough or the practice is not interactive.
    • Justification (Why is this important?):
      • Explain why this problem matters.
      • Example: Learning basic algebraic operations is the foundation for more advanced math skills and helps students develop logical thinking and problem-solving abilities.

✅ If your team finishes early and still has time, ask the teacher about Stage 2. You may be allowed to start working on the next part of the project.


April 28, 2025

Week 31 - Block programming with Scratch

CLASS OBJECTIVE

Introduce block-based programming by creating a Scratch account and exploring its key features, such as sprites, stages, events, controls, motion, sounds, appearances, and more.


INTRODUCTION

BLOCK-BASED PROGRAMMING

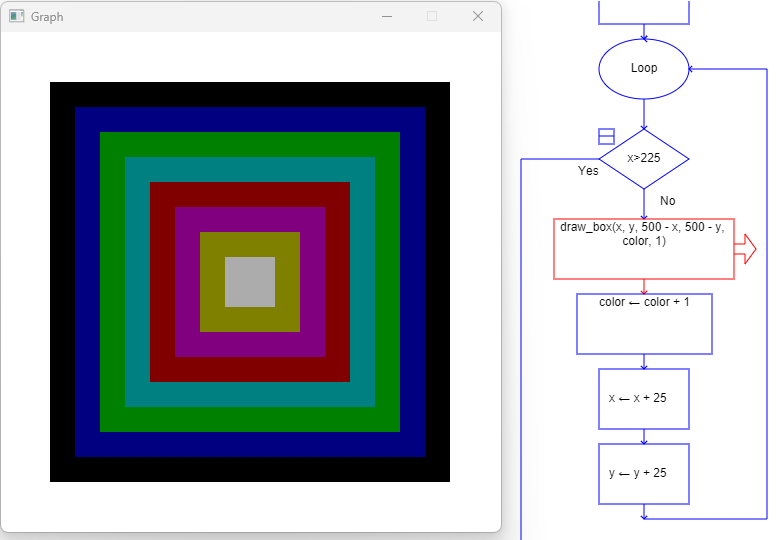
In this course you learned to program using different programming styles, like flowcharts (Raptor) and a didactic programming language (PseInt). Now you'll be introduced to block-based programming.

Block-based programming is a way of programming that uses visual blocks instead of writing code with text. These blocks fit together like puzzle pieces, making it easier to understand programming logic without needing to memorize syntax. It is very common in educational environments, such as Scratch, Blockly, or App Inventor, because it helps beginners (especially children and young people) learn the basic concepts of programming.

  • Sequences
  • Conditionals
  • Loops
  • Variables
  • Events

Each block represents an instruction or control structure, and by dragging and connecting them, the program is built.


Events

In block-based programming, an event is an action or situation that triggers or activates a block of code. In other words, the program starts executing certain instructions when that event occurs.


Control

These are the blocks that manage the flow of the program. They can easily be compared to traditional programming structures such as decision-making and loops, among others.


Stage and Objects

Programming in Scratch is often compared to animation, whether pre-programmed or interactive with a user. To achieve this, it is necessary to have a background (stage) and objects (sprite) that perform movements, change appearance, or play sounds.


Movement, Sounds, and Looks

These are essentially the actions that objects will perform when the conditions are met, or when the user decides.


Variables

As in any programming environment, the need to store data requires the use of variables, which are memory spaces labeled to store information related to the execution of a program.


Operators

Like variables, mathematical, text, and comparison operators are necessary for the execution of programs. With them, we can analyze and compare numerical information required for the execution of a program, even in a graphical environment.


SCRATCH ACCOUNT

Before you can star using Scratch, you have create an account in the next Web Address.

https://scratch.mit.edu/

Once in, follow the next steps:

  1. Click on the "Join Scratch" button.
  2. Create your user name using your student number, name and second name. 12345JosePerez
  3. Select MƩxico from the list.
  4. Add your birth month and year.
  5. Now your gender
  6. Write your school email address. a12345@idec.edu.mx
  7. Validate the process by opening your email account
Now, you're ready to start using Scratch. Use the CREATE menĆŗ to start programming.


Now, follow your teacher instructions to create your first program.


CLASS NOTES

As usual, write down the class title, the class objective, and answer the following questions:

  1. What are the differences between the Raptor, PseInt, and Scratch programming styles?
  2. Can you name at least three elements used in Raptor, PseInt, and Scratch?
  3. What is completely new to you in Scratch?

April 01, 2025

Week 28 - Selections and loops 2nd practice

CLASS OBJECTIVE

Reinforce the use of REPETIR and SI_ENTONCES commands by creating a new algorithm in PSeInt, but this time using a flowchart as a visual support. This new algorithm's purpose is to analyze a number to determine whether is a prime number or not.


INTRODUCTION

Today you're going to create a new algorithm to determine prime numbers. You already know the commands and the programming structures, except for the MOD operator, but you'll find it's a very easy mathematic operator related with division.


MOD OPERATOR

You're going to use a new operator, its name is MOD and the symbol that represent it is %

In this case, it doesn't mean "percentage", in this case means REMAINDER of a division.

For our practical purpouses, you must know that every time you get a remainder zero it means you found an exact divisor.

Try the next algorithm in PSeInt:


COMMENTS

This feature could be very helpful to remember how your PseInt algorithms work.  Add comments using double slashes.  

Everything you type after the slashes will be ignored by the interpreter, so you can add as many comments as you need.

// comentarios


ACTIVITY 1 

  • Start naming the algorithm, its name will be NĆŗmeros_primos, without spacesRemember the difference between the algorithm name and the file name, in which you can use spaces. 
  • For the file use the name Student name + nĆŗmeros primos.
  • Now, you're going to use the next flowchart to create the algorithm in PSeInt. Remember you have to type commands and operators, or you can click on the left and right panels instead to insert then in the algorithm.


After you finish, press the "play" button to test it. Obviously it must tell you if a given number is prime or not.

Save the file and, before you turn it in,  press the "flowchart" button. Does it look like the image above?


CLASS NOTES

Write down in your notebook the title of the class, the objective and follow the instruction.

  • Write down the algorithm code from PSeInt in your notebook and explain, using your own words, what does every code line do, from the first until the last.

Show your answers to your teacher.

March 23, 2025

Week 27 - Selection and loops practice

CLASS OBJECTIVE

Reinforce the use of the SI ENTONCES and the REPETIR commands by creating algorithms by yourself, just knowing the final result of the program.


INTRODUCTION

Last class you learned the use of SI ENTONCES to create multiple paths in an algorithm. By the analysis of  variables content the procedure can change and produce different outcomes.

Today you'll create by your self a program to analyze a word's length, obviously using SI ENTONCES, and after this you'll adapt the program to be repeated until the user chooses to exit.

Remember, you won't get any help from your teacher.


ACTIVITY 1

Remember, the activity's purpose is that you create the algorithm all by yourself so, you'll receive a just a couple of guidelines.

  1. Name the algorithm LONGITUD_DE_TEXTO
  2. Declare a variable to save a word
  3. Ask the user for a word and save it into the variable
  4. Tell the user IF the word's length has more than 15 characters (tip: you'll also have to use LONGITUD() function)
    • Otherwise, tell the user the word is smaller than 15 characters.
Look at the examples:


ACTIVITY 2

Now you have to add a loop to your first algorithm to repeat over and over until the user decides to finish it.

  1. Declare another variable to save a text
  2. You'll have to add the REPETIR/HASTA QUE command to wrap the last procedure.
  3. Inside the loop you'll have to ask the user if he wants to "try with another word", receive his answer and save it to the new variable.
  4. The algorithm will continue until the user types some letter different to the "s" letter.

Look at the examples:


If you need one last resource to finish your algorithm, look at the next flowchart:


CLASS NOTES

Write down in your notebook the title of the class, the objective and follow the instruction.

  1. What kind of data type you choose to save the user's incoming words? why?
  2. What does the LONGITUD() function do?
  3. Nested IF is a programing resource to add more answers to a SI-ENTONCES instruction,  Would it be possible to create a Nested IF in PSeInt? How?
  4. How did you indicate the "different to" comparison symbol?

Show your answers to your teacher.

March 15, 2025

Week 26 - Selections and Loops using PSeInt

 CLASS OBJECTIVE

Create in PSeInt an algorithm that uses selections and loops (programming structures) by analyzing a flow chart that describes every step of process.


INTRODUCTION

Any programming language must have the selections and loops programming structures because ane procedure has to make decisions or to repeat procedures. Obviously PSeInt has this two resources among others. The name of this two command are: SI-ENTONCES and  REPETIR


SI-ENTONCES
I'm sure it'll be difficult to understand the "written" version of this commands, but I'm sure you'll get use to it. Look at the SI-ENTONCES examples:

In the flowchart it looks like:


Indentation 
As you can see, it's not as difficult as it looked. To keep it simple you must always use the indentation to show the inner step of the procedure on the right.


ACTIVITY 1
Now open PseInt and type the next algorithm. What does it do?


REPETIR

REPETIR is a command to create a loop, in other words, the repetition of a list of actions. In the next example, a message will be shown over and over until the variable div decreases until cero.


Now in a flowchart look:

Never forget to use the indentation to identify the procedures in the selections or in the loops structures.


ACTIVITY 2
Now open PseInt once again and type the next algorithm. What does it do? Have you done something like this before?


Upload the two files (SI_ENTONCES y REPETIR_HASTA QUE) to the Classroom post.


CLASS NOTES

Write down in your notebook the title of this class and the objective. Using Raptor symbols, draw the next flow charts.

  • Draw the flow chart for the Activity 1
  • Draw the flow chart for the Activity 2

Show your answers to your teacher.


March 04, 2025

Week 25 - PseInt, Programming learning tool

CLASS OBJECTIVE

To know for the first time the programming learning tool named PSeInt and its working environment by creating two algorithms using different data types: characters and floating point numbers.


THIRD PERIOD COVER
To get started, you'll create the cover for Period 3, in no more than 10 minutes. The requirements are the following:

  • Period III written in  large size font
  • Technology III written below the period title
  • Your name, list number and group
  • A drawing allusive to Programming languages


INTRODUCTION

As you learned last class, before you start programming you have to know some basic rules of the programming languages: declare different variables types, the using of delimiters, the recongnition of sentences or code lines.

Today we'll start using PSeInt which is a very helpful tool to start learning programming languages. By the way, it works in spanish.

This is the PSeInt main window.


  1. This is the tool bar. In here you'll find tools like the save, save as, new, do and undo buttons. There are also two very important buttons here, the execute and the flowchart buttons.
  2. The main working area. This is where you're going to create the program by typing commands or operation names, right between the start and end algorithm points.
  3. The list of the available operations for data processing. For example: the basic mathematical operators, comparison operators, character operators, etc.
  4. The commands and programming structures. This is a helpful guide to remember how to interact with the user, how to analyze the information and how to use selections or loops in an algorithm.
To create an algorithm you'll have to type every sentence (code line) between "Algoritmo" and "Fin Algoritmo". Don't forget to name your program where the algorithm starts.


Variables

When using PSeInt, before you use variables you'll have to declare them. This means you have to reserve and name a memory space before you use it. How to do it? You´ll use the word "Definir", type the name and select data type.


  • Caracter is used to save letters and some symbols.
  • Entero is used to save integer numbers.
  • Lógico is used to save "true" or "false" answers.
  • Real is used to save decimal numbers.

There's only one way to learn how to use PSeInt, by creating programs.


ACTIVITY 1

Start naming the algorithm, its name will be Contador_de_caracteres. As you can see, you can´t use spaces.

Now try to type the next algorithm, I'm sure you'll have to correct some mistakes, it always happen the first time. For example, if you miss the semi-colon delimiter or the quotation marks PSeInt will inform you.

  • Escribir and Leer are "well known for you" commands (reserved words), to show information or to ask for information to the user.
  • Longitud is an operator to count letters in a string.


After you finish, press the "play" button to test it.

Save the file and, before you turn it in,  press the "flowchart" button. I hope it could be familiar for you.


ACTIVITY 2

For the second activity, you'll try to create the next by your self. 

The only different thing you'll need is a small arrow in the assignment formula. 

To get it, type <- (less than and dash)


Once again, after you finish, press the "play" button to test it.
Save the file and, before you turn it in,  press the "flowchart" button.


CLASS NOTES

Write down in your notebook the title of the class, the objective and answer the next questions.

  • What does "declare variables" means?
  • What are the four data types in PSeInt?
  • Which of those were used in today's activities?
  • What is the semicolon used for?
  • What are the Quotation marks used for?
  • How did you type the assignment arrow?

Show your answers to your teacher.


February 25, 2025

Week 24 - Electronic Waste

CLASS OBJECTIVE

Learn about the fate of electronic devices after their use and disposal, and how this knowledge can help improve our consumer habits to support the planet's ecology.


INTRODUCTION

Today, it’s impossible to imagine life without electronic gadgets like computers, cell phones, earphones, speakers, clocks, watches, TVs, ovens, washing machines, and more.

Every electronic device is made of hazardous materials such as cadmium, lead, antimony, nickel, and mercury.

What is the most common reason you replace your phone? Was the change truly necessary?

What happens to these gadgets once they are discarded?

Here's your first activity


RESEARCH ACTIVITY

As with previous topics, you will conduct a research activity. Use either web sources or artificial intelligence to answer the following questions.


Write today's title, class objective, write questions and answers.

  1. Ethically speaking, what does “reducing shelf life to improve sales” mean?
  2. What is planned obsolescence?
  3. Which companies have historically used planned obsolescence?
  4. What happens to the discarded electronic devices?
  1. What is the meaning of e-waste?
  2. Is a problem the cheapening of electronic products?
  3. What is the Internet of things?
  4. How much electronic waste is generated today?
  5. Name at least four toxic materials used in the production of electronic devices
  6. Where is the biggest e-waste dump in the world?
  7. How can e-waste be avoided?

Now, we'll watch two videos to get deeper into it.

From minute 3:00 to 6:15
Closed caption suggested and 0.8x speed


From minute 1:45 to 11:00
Closed caption suggested and 0.8x speed

Video conclusions from minute 14:20 to 16:00


CONCLUSIONS

Add a last question to your notes and answer it:

  • What can we do in our community to reduce e-waste? Provide a list of three proposals

February 18, 2025

Week 23 - Pseudocode practice

CLASS OBJECTIVE

Create and execute a program using pseudocode (algorithm written in your own words) to perform a specific task inside the classroom, so we can write our first program using words and statements.

To reinforce the concepts from our last class, today we'll begin creating our first programs. Before you start, there are a few key points and guidelines to understand.

  • First, you need to know the goal of the task—what the program is supposed to accomplish.
  • Next, take a sheet of paper and design the procedure, using program structures such as decision-making statements and loops, with a minimal set of instructions. Keep in mind that you should only include actions the program is capable of performing.
  • Once you've completed your program, you won’t be running it yourself; another entity, the Interpreter, will handle its execution.


ACTIVITY

PHASE 1. PROGRAMMER

  1. Pick a sheet of paper, select one of the next goals and write it on the paper as a title.
    • Open/Close window. Select the windows by its number.
    • Turn on/off the fan.
  2. Now, write the pseudocode using natural English, but structured in a way that reflects programming logic. Use the next reserved words list:
    • START
    • END
    • ACTIONS
      • Step_forward
      • Step_back
      • Turn_left
      • Turn_Right
      • Switch_on
      • Switch_off
      • Open
      • Close
    • IF condition DO
      • Action 1
      • Action 2
      • Action n
    • ELSE
      • Action 1
      • Action 2
      • Action n
    • (LOOP) WHILE condition DO
      • Action 1
      • Action 2
      • Action n
  3. You can stand up (respectfully) to test your program
  4. Once it's finished, write your student number (NO NAME) and give it to your teacher.


PHASE 2. INTERPRETER

To grade the pseudocodes, some students will take on the role of an Interpreter. This means they will follow the program’s instructions to evaluate its design.

  • The teacher will call on students one by one to stand up and execute a randomly selected program.
  • If the program doesn’t achieve the desired goal, the sheet will be returned to the programmer for corrections. 
  • If it works as expected, the programmer will simply add their name.


CLASS NOTES

As usual, write down the class title, the class objective, and answer the following questions:

  • Is this activity written in a programming language? Why or why not? What’s the difference?
  • When writing the program, did you use statements and delimiters? Provide an example.
  • Did you identify any reserved words? If so, name three of them.
  • Were there any variables in this activity? Was any data necessary to complete the task? If so, list it.

February 10, 2025

Week 22 - Programming Languajes Theory

 CLASS OBJECTIVE 

Establish the bases for the work of the next phase, whose main topic will be the Programming Languages, through a research that will be resumed in plenary with brainstorming.


RESEARCH ACTIVITY

THEORY OF PROGRAMMING LANGUAGES
You'll research the following concepts on the Internet and later we will return them in plenary with brainstorming.
In Classroom you will receive a document to recover the investigated information .

  • What does pseudocode mean?
  • What are programming languages?
  • What are statements in a programming language?
  • What are delimiters in a programming language?
  • What are "reserved words" in a programming language?
  • What is a variable in programming?
  • What are the data types in programming?


CLASS NOTES
As always, you will write down the title of this class, the objective and the above questions, but in this activity you will use your own words to describe what you understood about each concept.


HOMEWORK
Write down the answers to the following instructions in your notebook:

  • Research on the Internet What is PseInt?
  • Also look for an image of the main PseInt work screen and draw it.

February 07, 2025

Week 21 - Canva

 CLASS OBJECTIVE

Create an Instagram post for the Grease Musical event using Canva web service.


CANVA.COM

Elements that will be requested for the design of the publication in Canva

Do not use templates, each publication must be original.

Each student will make a design for publication on Social Networks, preferably Instagram (due to its size 1080x1350 and preference for use in the educational community)

  • Post Name: Registration + Full Name
  • Change of background, solid or gradient.
  • Insert the IdeC shield, in the Brand option.
  • Insert at least a couple of elements directly related to the musical (Grease), such as Shapes or Frames, Stickers or images from the Collections. They can also be photos, if you already have them.

Informative texts:

  • Title of the musical (Grease)
  • Date and time of the event (May 23 and 24, 4:00 and 8:00 p.m.)
  • Where to buy tickets (Online platform pending)
  • Teatro Diana (Av. 16 de Septiembre 710, Guadalajara, Jal.)


January 08, 2025

Weeks 19-20 - Boxes practice in Raptor

CLASS OBJECTIVE

Learn to use the DRAW_BOX() call and practice the loop programming structure, using the graph window in Raptor, by creating given images, using boxes.


INTRODUCTION

Today, you'll learn how to use the draw_box() function and create two different products, the first with some assistance and the second completely alone.    

draw_box(x1,y1,x2,y2,color,filled/unfilled)

  • x1,y1 are the coordinates for the first corner of the box. (left lower corner)

  • x2,y2  are the coordinates for the opposite corner of the box. (right upper corner)


For example, in a 500x500 graph windows we can use the draw_box Call like this:

draw_box(150,150,350,350,1,1)

and the result should look like:


So far, we’ve been referring to the colors using their names, but you can also refer to them using numbers between 0 and 15. Click here to see the complete list of colors.


FIRST PRACTICE
Read the instructions to create the next logo. Obviously you'll have to remember how to create the circles and practice the DRAW_BOX command to create the boxes.
  • File name: Green Lantern
  • Window dimensions: 400x400
  • There are 3 circles and 2 boxes so you'll use the DRAW_BOX and DRAW_CIRCLE instuctions. Find out the coordinates by your self.
  • You'll need the FLOOD_FILL instruction.


CLASS ACTIVITIES


First activity

Now, you'll have to create a program, using boxes and loops, to draw an image like the one below.

  • In order to get the center of the boxes to be the same (250,250), we’re going to set coordinates (x,y) the same values.
  • First we declare variables x and y with  a value of 50, this value is going to increase by 25 in each iteration. We are not creating x2 and y2 variables, instead we are going to set x2=500-x and y2=500-y.
  • To paint every box with a different color, we need to create a variable named color with an initial value of 0, this value will increase by 1 in each iteration.


Second activity

Now you'll use boxes and loops once again to create the next product, in the graph window, by your self.

Consider that the graphic window is not a square this time so its dimensions are not 500 x 500 anymore.


CLASS NOTES

Write down in your notebook the title of the class, the objective and follow the instructions.

  • Draw the final flow chart, shown in both Raptor programs.

  • Explain what every step of the flow chart does, from the start symbol to the end symbol.